Here is the tutorial, there are a lot of great ones online but this is one that I made for a wonderful friend. I hope that it is helpful.

The first step is to find some awesome fabric that you love:). You need about a yard and a quarter of each piece. I think that any cotton will do. I made the first one for Julian out of some cotton and flannel because it was super cold last winter. Than I made him a cotton/muslin combo for the heat of summer. The last two I have made where just cotton prints. After finding the fabric I always do a prewash to make sure my cotton has shrunk down to size. And then iron the two pieces.

The second step is to lay them on top of each other, rights sides facing each other. I like to do that because I can make sure that I cut out both pieces the same size and once I am done cutting I can go straight to sewing once I have pinned them together (which I don't always do but it is highly recommended).

The third step is cutting out the material which I cheated at because I just cut around the one that I made before but the measurements are 42 inches long by 35 inches wide. (Remember to keep an eye on which way your print is running because once you cut it is hard to go back without having to piece your fabric together).
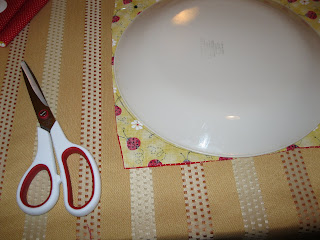
Next the fourth step is to round out your edges which gives the cover a finished look but most importantly helps to keep your cover clean by ensuring that it won't drag on the floor. Just use the largest plate or bowl that you have, trace around the four corners and cut.

The fifth step is sewing the two main pieces together. (As you can see I didn't use pins here but I am a super lazy sewer and things always seem to go easier when I do). On a side note you can use a color of thread that matches your fabric or one that really stands out. It is just up to your creativity. Also I think the most convenient seem allowance is a half inch. However, giving or taking a little bit will not ruin your project, it will just add or take a half inch. Make sure to leave a three to five inch opening so that you can flip the cover.

The sixth step is to flip your cover right side out by sort of pulling it through the little hole that you left. Once it is right side out, iron the entire cover making sure that your seam is all the way out. I like to use a chop stick or a skewer to help get the edges nice and flat.

The seventh step is to top stitch around the entire cover. This is where you close the little opening that you left earlier.

Next, the eighth step is to make the straps that will hold it to the carseat. You can make these with velcro, ties, snaps, or buttons. My personal favorite is tie, because it is easy to adjust but the buttons look pretty cute. I really like how the last button one turned out but I sewed a piece of pelon in the end of the strap so that it would not sag around the button. You can make the straps out of the material that you have on the reverse side of your cover or a combination of the two. My new favorite way to do it is can be found at this link. If you want to do the tie you need a piece that is at least 18 inches long and two and a half inches wide. You can go wider for a more chunky look. The variations for how to do this are endless and it is just up to the look you are going for. -After you decide what to do you sew the pieces together, sew right sides together with half inch seem allowance, then flip right side out. Don't top stitch except to close the strap on the end that won't be seen when closing (or with ties just one of the ends).

The Ninth step is to sew on the closures. For buttons you can use the button maker function on the sewing machine to make the button hole but if you don't know how or if the button is too big than use the zig zag function to make a rectangle, than cut a slit in the middle to make a button hole.

Next step, after sewing the closures, measure 21 inches from bottom and 19 inches from the top and pin your closures in place. There should be 9 inches between the closures. I made these just a touch too far apart. If you think your carseat is odd shaped you can pin these on to make sure that they are in the right spot.

The eleventh step is to sew closures on with the zig zag stitch on the outer side of the cover. Sew in a box shape the width of the closure by about roughly an inch and a half.

Then you are finished!
Hopefully these instructions are helpful. Please let me know if you have any questions. I found the earlier link after I made the third one and thought that is was very help and clear but I put the earlier ones together by just measuring it on my carseat. The cover is essentially a receiving blanket with closures on it to attach it to your carseat. I have also used my tie carseat cover for a nursing cover and a blanket in a pinch.
this is great. I hope to make one of these, soon.
ReplyDeleteThanks for sharing!
Dave says you are hard-core! And I am excited to try out this project.
ReplyDelete